Gremlin hunting.

26 May

What started as simply chasing down that electrical short turned into gutting the dash of superfluous wiring then replacing the main lamp switch and pulling, rebuilding, and refacing the gauges and reseting and refacing the odometer.

Speedometer:
Flickr_2012_05_25_05_57_48.jpg

Flickr_2012_05_25_05_58_58.jpg

Untitled

Flickr_2012_05_25_05_58_09.jpg

Not completely happy with the new odometer decals but watcha gonna do…
Flickr_2012_05_25_06_21_03.jpg

Flickr_2012_05_26_12_10_31.jpg

Combination meter:
Flickr_2012_05_25_08_20_10.jpg

Flickr_2012_05_25_08_54_54.jpg

Flickr_2012_05_25_08_30_24.jpg

Flickr_2012_05_25_09_24_01.jpg

I’ve repainted the needles and refaced the individual parts of the combination meter but its late and I’m waiting on some parts to arrive before reassembling and snapping pics.

Gauge glass …flat, rough cut glass. Not tempered or laminated. Cut you to ribbons type glass.
Flickr_2012_05_25_09_03_12.jpg

Keep is earned.

15 May

After a long day of hauling heavy furniture and boxes across the greater St.L area, I began hearing an electrical pop every time we’d hit a bump. There’s a short grounding out in the cab somewhere. Headlights went out just as I pulled down my street. Looks like I’ll be replacing the harness asap.

2012-05-12 17.04.02.jpg

2012-05-12 19.30.09.jpg
(Pardon the hubcaps. I finally got a fourth beater but I took em all off at the warehouse just to see what it looked like for a day or two.)

I wasn’t all bummed. A block or two back at a traffic light just before the headlights cut out, some guy pulled up, shot a couple compliments my way and asked if I was interested in selling. That’s happened twice since we buffed the rust out.

Exfoliation!

7 May

Got some work done on the exterior. Greg and I spent the better half of a f’ing hot day basically wet sanding the exterior with CLR and Scotch-brite and then re-buffing it with chrome polish. Still needs a bit of work and I plan on repeating the entire process several more times but its getting there. Looks nice with the shine and a some reflections happening in the paint. …the dark green is the original Juniper Green.

(will update w/pics of the tailgate asap)

BEFORE:
2011-03-30 16.16.37

AFTER:
2012-05-06 09.15.26

BEFORE:
2011-03-30 16.16.26

AFTER:
2012-05-06 09.16.40

BEFORE:
2011-05-06 16.01.50

AFTER:
2012-05-06 09.17.14

BEFORE:
1951 Chevy 3100 1/2 Ton

AFTER:
2012-05-06 09.15.37

Finesse required.

30 Apr

New shift box in! Shifting has improved but it is almost 100% necessary to double clutch every shift and the trans still occasionally jams in 1st if you’re sloppy and try to shift too quick. I’m hoping that the rest of the bushing kit will cure the issue.

On that note, the gf lent a hand in the shift box swap. She was more than curious about everything I was doing and after explaining the 3OTT pattern and principles of double clutching, she now wants to learn to drive stick. Needless to say, I’m in heaven.

Toast.

23 Apr

After driving around for a few days its apparent that the shifter box is toast. Its worn too far down and is allowing the middle tab to slip between the forks. New/rebuilt box ordered this morning.

Also figured out how to hook up the throttle cable … apparently it threads thru the throttle linkage rod where it attaches to the carb. Just have to pick up a cable stop somewhere.

Snot.

11 Apr

Greg and I made a bit more progress on the ol’ girl tonight. She kept getting jammed in first so I pulled the shift box off the steering column, cracked it open, washed it in kerosene and rebuilt it. Still need to order some bushings and grommets for the rest of the linkage but this alone was a vast improvement.

BEFORE: …~60yr old grease is some nasty snot.
Flickr_2012_04_11_04_05_06

AFTER:
Flickr_2012_04_11_05_14_34

Busy, busy, busy!

9 Apr

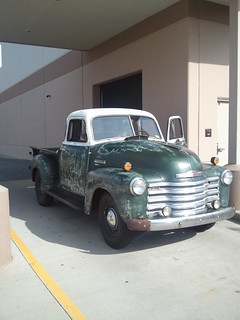
Friday: Bryan and I fire it up and after a minute of rough idling the water pump blows. Sprayed coolant everywhere. Luckily, I have that spare motor with a working pump and Autozone had the gaskets in stock. So, we drain everything, pull the radiator and replace the pump. Went smooth, no leaks.

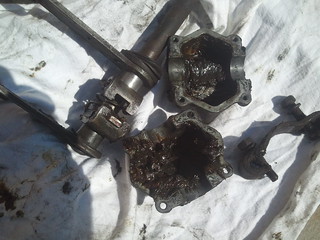
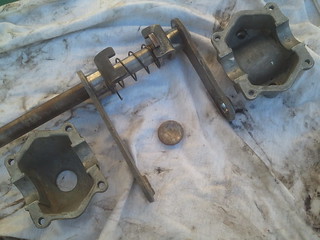
Saturday: Greg comes over and we start trouble shooting the fuel issue. Flow is a trickle at the carburetor. After a beer and another trip to Autozone for a fuel pump gasket, we pull the 62 year old mechanical glass bowl fuel pump off the spare motor to replace the cheap 20yr old aftermarket pump on the “running” motor. I figured I should open up the pump we’re using and clean it out a bit before installing, so I do and, POP!, there goes the sixty-two year old bell shaped top cap that holds the glass bowl on. Gone. Can’t find it anywhere. Did I mention it was SIXTY-TWO years old. No replacement parts. Then I remember that I have another non-working but complete fuel pump in the basement in a box of parts from the previous owner. Problem solved. Pump cleaned, reassembled and installed. Still no flow at the carb but the bowl eventually fills and the fuel is clean. It filled slowly so we know the issue has to be upstream which means a clogged line or tank outlet. We push the ol’ bitch the rest of the way out of the garage, slide under and there it is! Some farmer, in what had to be the 60’s or so, cut the metal line and installed a directional fuel filter the size of a softball. We pull it off and there isn’t much flow out of the tank above us. I point the filter down and the fuel is clear but pink, point it the other way and red sand. The whole thing was full of rust. I swear the previous owner told me the tank had been relined or at least cleaned out … oh well, no worries. I replaced the old filter with a cheapie from Autozone, turned it over and immediately we got a quarter beer bottle at the carb. Flow restored! We button everything up, Greg heads home and Bryan comes back over. We reset the timing. She idles well again. I spun her around the block. Ride was shaky, almost stalled a couple times but things are looking up! I’ll just keep replacing the fuel filters every couple drives until they stop getting cloudy.

Door art.

29 Mar

I think I’ve finally settled on the door art and overall concept I’ll be going with!!
Its been on my mind since I got the Bessie and I could never settle on any one idea until recently. I decided that I wanted a St. Louis City or Missouri State Parks theme with a slammed and rodded twist. The USDA logo is real but I have no information for US National Forest vehicles in MO so that part is made up but its based on the layout of the 1950’s logo for the USDA Hotshot Fire Crew of Angels National Forests in California.

Well, here it is…

1950’s US Department of Agriculture Forest Service, Mark Twain National Forest (Missouri), Utility Crew 13, Truck #2 …the ‘govt. use only’ part will go on the bed side just behind the cab.

(this is me, freehand on a Wacom tablet with Photoshop and time to burn)
BessieMarkTwainNationalForest

Dead again.

26 Mar

She died on me again. This time it seems fuel related. Met an old timer around the corner who has a 49 and a 54 Chev Coupe. Said he’ll let me borrow a 216 fuel pump.

Swampass BEGONE!

20 Mar

Been driving her everywhere for the past few days. Got a new seat in today. Its been reupholstered with a burlap weave flannel type material over nice dense foam. Its 1000 times better than the old nasty heavy vinyl cover over dead springs and broken down batting. No more ass/back sweat!

I’m doing the armrests and visors in black vinyl and the door halves and headliner in an old steer hide I have as a rug in my living room.