
…make that three tows.
31 Jul

Tow number three in less than a week.
Seems like fuel. Pump diaphragm or carburetor float. …vapor lock maybe? …we’ll see.
31 Jul
Tow number three in less than a week.
Seems like fuel. Pump diaphragm or carburetor float. …vapor lock maybe? …we’ll see.
22 Jul
Changed the oil, installed a new accelerator return spring and smacked the side mirror off backing into my garage. Wah wahhhh. Hopefully this isn’t the beginning of 7yrs bad luck.
A fellow stovebolter told me that “he don’t think so, since it’s a rear view mirror.” It just means I might of had some bad luck in the past that’s coming to an end. …Let’s hope so.
On the upside, I’m taking this opportunity to add the passenger side mirror and arm while I’m doing the driver side.
5 Jun
Finally received the parts to complete the combination meter along with some other odds and ends.
Still waiting on the backordered headlamp switch though … if it takes long enough, I’ll go ahead and order a new harness and period correct fuse block to run accessories through and just get it all done at once.

For a long while now the fuel gauge has intermittently worked. …more often not, but when it was working it was never all that accurate. At some point after disassembling the combination meter I noticed one of the posts on the back of the gauge was loose. Turns out its simply a knurled section of the post that presses through the fiber board on the back side of the gauge and the board had deteriorated around it. Unfortunately this fitting also holds the completed connection between the post and the gauge innards together. Although I was able to repair it by making a permanent connection with a dab of solder I chose to order a replacement gauge. When I received the replacement fuel gauge I immediately noticed that it didn’t match the decals I used to reface the rest of the gauges. So, I ended up having to order another decal sheet.
There are a lot of differences between the original and new gauges. The most annoying is that the new one is a smidge taller causing the trim plate to press against the needle. This was remedied by gently grinding out the edge making contact with the needle and slightly bending the center portion of the trim plate outward to clear the needle base.
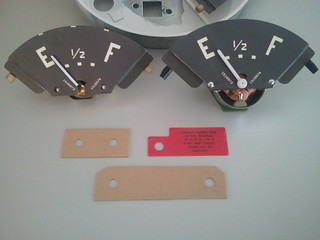
After refacing. Insulators, warning tag and gauge comparison. (Old on the left, new on the right.)

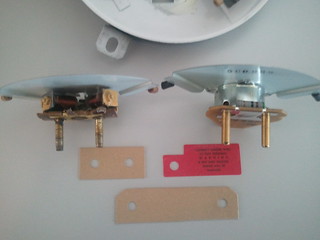
Back of combination meter.

Detail of new warning tag.

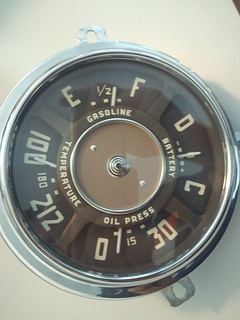
Reassembled combination meter.
Side note: My kitchen counter tops make an awesome neutral gray background. 8)
9 Apr
Friday: Bryan and I fire it up and after a minute of rough idling the water pump blows. Sprayed coolant everywhere. Luckily, I have that spare motor with a working pump and Autozone had the gaskets in stock. So, we drain everything, pull the radiator and replace the pump. Went smooth, no leaks.
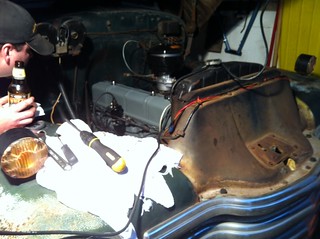
Saturday: Greg comes over and we start trouble shooting the fuel issue. Flow is a trickle at the carburetor. After a beer and another trip to Autozone for a fuel pump gasket, we pull the 62 year old mechanical glass bowl fuel pump off the spare motor to replace the cheap 20yr old aftermarket pump on the “running” motor. I figured I should open up the pump we’re using and clean it out a bit before installing, so I do and, POP!, there goes the sixty-two year old bell shaped top cap that holds the glass bowl on. Gone. Can’t find it anywhere. Did I mention it was SIXTY-TWO years old. No replacement parts. Then I remember that I have another non-working but complete fuel pump in the basement in a box of parts from the previous owner. Problem solved. Pump cleaned, reassembled and installed. Still no flow at the carb but the bowl eventually fills and the fuel is clean. It filled slowly so we know the issue has to be upstream which means a clogged line or tank outlet. We push the ol’ bitch the rest of the way out of the garage, slide under and there it is! Some farmer, in what had to be the 60’s or so, cut the metal line and installed a directional fuel filter the size of a softball. We pull it off and there isn’t much flow out of the tank above us. I point the filter down and the fuel is clear but pink, point it the other way and red sand. The whole thing was full of rust. I swear the previous owner told me the tank had been relined or at least cleaned out … oh well, no worries. I replaced the old filter with a cheapie from Autozone, turned it over and immediately we got a quarter beer bottle at the carb. Flow restored! We button everything up, Greg heads home and Bryan comes back over. We reset the timing. She idles well again. I spun her around the block. Ride was shaky, almost stalled a couple times but things are looking up! I’ll just keep replacing the fuel filters every couple drives until they stop getting cloudy.
26 Mar
She died on me again. This time it seems fuel related. Met an old timer around the corner who has a 49 and a 54 Chev Coupe. Said he’ll let me borrow a 216 fuel pump.
18 Mar
Finally found some free time to get out to the garage. …ended up having to take a week long vacation with nothing planned. It poured all day but we got her running.
My friends Travis and Bryan came by to help with the timing from the ground up. I was right, the dizzy spun so we had to pull it out completely, reset the oil pump gear, replace the rotor, re-gap the points and plugs then reassemble correctly, time with a light and adjust idle at the carburetor. We dialed everything in 100 times better than it ever has been since I, and I would imagine the previous owner, have owned it.
The rain let up for a bit so we took her out for a spin around the park then grabbed our other cars and went for a celebratory burger and beer. Good times!


1 Feb
Looks like the no start issue is a result of the dizzy jumping time. I think the bracket slipped and it spun until the grease cap hit the push rod cover.
Unfortunately its still cold out and the garage is too tight to work in. Hopefully I’ll have it back on the road within the month if we get a warm day or two.
21 Dec
The bad – New plugs, wires, points, coil, cap and rotor installed. Nothing.
The good – Finally got the old girl into the garage where she can stay warm and cozy for the winter! I was worried I’d have to leave her outside in the rain and snow but with the spare motor still on the hoist and positioned sideways against the back wall she fits. There’s about 1/4 of an inch between the intake manifold on the spare motor and the rear sill under the tailgate, 1/4″ between the top of the carb stud and tailgate bottom edge and maybe 5″ from the front bumper to the door and 4-5″ between the roof and the celling. And thats with no rear bumper and 60yr old sagging springs.
12 Dec
Bessie died on me about a mile from home yesterday and the girl I recently started seeing met me where I was stranded with a cup of coffee. While I waited for a tow I started to trouble shoot out loud and she surprised the hell outta me by rattling off a few very realistic possibilities. …could this be heaven?
She’ll turn over no problem and backfire occasionally (Bessie, not the GF 😉 ) but I just can’t get her running. The starter rolls it with out the coil wire just the same so my guess is spark … the back fire says its intermittent. I have new coil and plug wires I’m gonna throw on tonight. Might need to find a new ignition coil though…
4 Dec
Drove to Indiana to pick up one of Nostalgia Sid’s 4″ drop axles from fellow Bolter, Dan S. While there, I took his 49’s tired old 216 off his hands along with it’s three speed transmission and steering box.
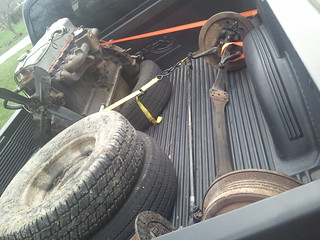
Technically this is as plug n’ play as it gets with this type of thing. Mount the axle, connect the brake line, bleed the brakes and bolt on the wheels. Having come off Dan’s ’49 3100 though, the brakes are the Huck type while Bessie, being a ’51, has the later self adjusting Bendix type. From what I understand the Huck brakes are prone to fade more so than the Bendix type, and require more frequent periodic adjustment. Parts are a bit more expensive too. Lucky for me they only have a couple hundred miles on them after being rebuilt. I figure I’ll use them until they need another rebuilding or prove to be a pain, after which I’ll look into rebuilding my front Bendix drums or doing a disc conversion. Either way, I’m replacing the single reservoir master cylinder with a dual.
Plug for Nostalgia Sid – www.droppedaxles.com
Two plugs for Dan – www.48chevytruckrebuild.blogspot.com – www.whetzeltracetravelers.webs.com