Archive | Electrical RSS feed for this section

Gremlin hunting. …cont’d.

5 Jun

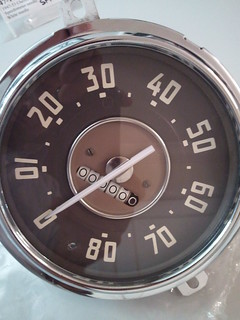
Finally received the parts to complete the combination meter along with some other odds and ends.
Still waiting on the backordered headlamp switch though … if it takes long enough, I’ll go ahead and order a new harness and period correct fuse block to run accessories through and just get it all done at once.

2012-06-05 12.34.10.jpg

For a long while now the fuel gauge has intermittently worked. …more often not, but when it was working it was never all that accurate. At some point after disassembling the combination meter I noticed one of the posts on the back of the gauge was loose. Turns out its simply a knurled section of the post that presses through the fiber board on the back side of the gauge and the board had deteriorated around it. Unfortunately this fitting also holds the completed connection between the post and the gauge innards together. Although I was able to repair it by making a permanent connection with a dab of solder I chose to order a replacement gauge. When I received the replacement fuel gauge I immediately noticed that it didn’t match the decals I used to reface the rest of the gauges. So, I ended up having to order another decal sheet.

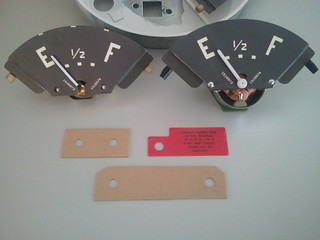
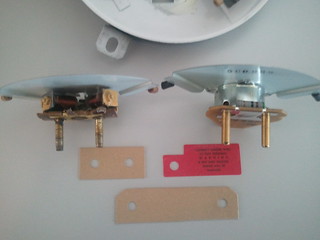
There are a lot of differences between the original and new gauges. The most annoying is that the new one is a smidge taller causing the trim plate to press against the needle. This was remedied by gently grinding out the edge making contact with the needle and slightly bending the center portion of the trim plate outward to clear the needle base.

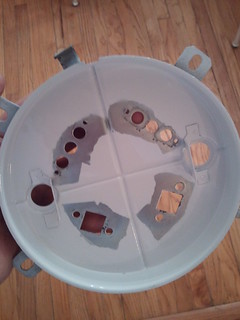
After refacing. Insulators, warning tag and gauge comparison. (Old on the left, new on the right.)
2012-06-05 10.15.12.jpg

2012-06-05 10.16.21.jpg

2012-06-05 10.16.46.jpg

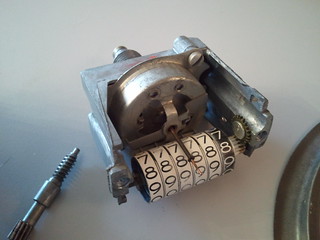
Back of combination meter.
2012-06-05 11.34.45.jpg

Detail of new warning tag.
Flickr_2012_06_05_10_19_22.jpg

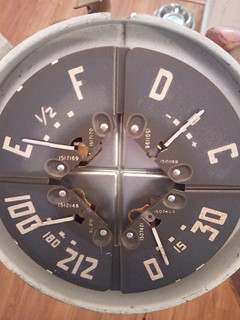
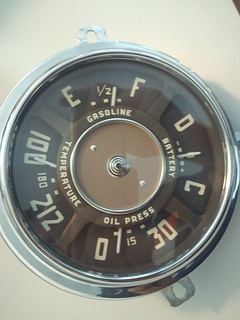
Reassembled combination meter.
2012-06-05 11.33.50.jpg

Side note: My kitchen counter tops make an awesome neutral gray background. 8)

Gremlin hunting.

26 May

What started as simply chasing down that electrical short turned into gutting the dash of superfluous wiring then replacing the main lamp switch and pulling, rebuilding, and refacing the gauges and reseting and refacing the odometer.

Speedometer:
Flickr_2012_05_25_05_57_48.jpg

Flickr_2012_05_25_05_58_58.jpg

Untitled

Flickr_2012_05_25_05_58_09.jpg

Not completely happy with the new odometer decals but watcha gonna do…
Flickr_2012_05_25_06_21_03.jpg

Flickr_2012_05_26_12_10_31.jpg

Combination meter:
Flickr_2012_05_25_08_20_10.jpg

Flickr_2012_05_25_08_54_54.jpg

Flickr_2012_05_25_08_30_24.jpg

Flickr_2012_05_25_09_24_01.jpg

I’ve repainted the needles and refaced the individual parts of the combination meter but its late and I’m waiting on some parts to arrive before reassembling and snapping pics.

Gauge glass …flat, rough cut glass. Not tempered or laminated. Cut you to ribbons type glass.
Flickr_2012_05_25_09_03_12.jpg

Fun stuff! (Pt. Trois)

23 Feb

Untitled

Its a 1921 Protex “stop” lamp. Thought since the ol’ girl’s 6v tail lamps were so dim I should add a third brake light. It’ll get mounted in the back window off to one side or the other, not sure which yet tho. …D side probably. Need to repaint the inset area black.

Diggin’ in.

14 Apr

Finally got out and started gutting the cab of superfluous wiring and whatnot, and decided to take a stab at fixing the speedometer after pulling the dead AM radio. It’s a frickin 60 year old, brittle, cloth covered rats nest under the dash.

Looks like theres more body rot than I first suspected … In addition to the inner and outer cowls, and the inner and outter cab corners, it looks like I’ll probably have replace /patch both sides of the floor and the and the cowl to cowl plates below the door hinges.
I’m torn at this point… not sure if I should gut it and begin a full restoration or just get it cleaned out and keep it running, replacing only what really needs replacing.
I’m leaning toward the latter just because I’d like to use it for a few years til I put it outta commission for up to several years while it’s undergoing a full restoration.

2011-04-13 18.31.22.jpg

Thought this was kinda cool … its the date that’s stamped in the back of the speedometer.

2011-04-13 18.35.00

There’s no VIN on the truck, didn’t have em back then unless your particular state issued a series, but the body number says my truck came from the St. Louis plant and rolled off the line in August of 1951.

2011-03-30 17.01.15

2011-05-07 17.45.23

head casting code

Also took some BlueMagic chrome polish to the dash paint. I figured it was a mild enough abrasive/polish that it might just work to get the rust/oxidation/60yrs of dust off … it did.
I also bleached the last 60 years of ass grime outta the vinyl seat cover and fixed the speedometer. It works but the needle was dry and warped and the tip broke off, so I ordered a load of parts to refinish the gauges.

…and while I was ordering those parts, I came across a matching 1947-51 oil bath air cleaner that I’m going to gut so I can run a paper or oiled fiber filter (K&N) but keep the original look. There’s nothing wrong with the one I have now but I think oil vapor gets sucked into the engine and causes it to smoke when it idles.

Under the shade tree.

21 Mar

Been cruising in the ol’ girl as much as possible. Fast food, the hardware store, friends houses, aimlessly around town, you name it.

The more I get to know this truck the more I’m starting to notice the shade tree modifications and repairs that have been done over the past 60yrs. For instance, the rear bumper isn’t a rear bumper at all. Rear bumpers were offered as an option in ’51 and the farmer who originally purchased this particular truck opted not to get one. Instead, sometime later when they added the home brew hitch they used a ’47-53 fromt bumper and braces mounted to the frame at the rear as main supports. …it’s probably plenty strong but I don’t trust it and its all coming off in favor of the bumperless look.

2011-03-21 18.17.02

2011-03-21 18.19.47

2011-03-21 18.17.47

2011-03-21 18.18.07

2011-03-21 18.23.08

Its actually pretty well made. Heavy steel, solid welds and even a license plate light.

The tail lamps are an interesting mess too. Not sure what the brackets came off but I’ll be replacing them with the correct repop brackets when I redo the wiring.

2011-03-21 18.20.58

2011-03-21 18.21.41